web analytics
Skip to content


Are you constructing a new house or looking to make improvement in your existing home? If you need a swimming pool then why don`t you try making your own DIY swimming pool. You need to know that it is basically an investment that you made in your home. You won`t regret it. To build this project on your own you need to follow below mentioned steps.

What you want
First of all you need to ask yourself that what your requirements is. In this you need to decide about your family requirements and budget that you can put in this project. You need to know your limits before you start digging for pool.

Measure and Design
When you have decided about the budget and family requirements then you need to decide about the space that you can manage for DIY swimming pool. There are families who wanted to have a BBQ areas, some grass as well as a living space along with pool. So you should not give all the space to your pool.

Start Digging and Building
Once you have marked the place then you have to start digging for your pool. You need to make sure that as you dig, you need to start attaching strong, thin wood which can create an outer wall for your pool. You also have to add the required skimmer/insulation/return fitting. Now you can also cover these walls with special foam which is necessary for pools.

Building Deck and Fence
You can build the fence even earlier if you have small children at home. Once you have built the fence, then you can start constructing the deck around this fence. The preferred choice for decking is concrete but wood will also look great. If you love a natural look then wood will be a perfect option for you.

Making a Cleaning Schedule
When you are done with completing you DIY swimming pool, then you should also make a cleaning schedule for it. It is important because a dirty pool will surely not acceptable after making such hard efforts and investing good amount of money.


If you are one of those who love to do DIY activities and have all the tools available with you, then why you haven`t tried DIY platform beds? If you have some free time then there are different easy ideas available for you that you can execute on your own.

Platform bed including built in storage
This is a project for those who have already executed some DIY woodworking projects. If you are new to this field then you have to be extra careful. You will surely know that a platform bed with built in storage is definitely a yes. Everybody will happily accept this bed for their home.

One thing that you need to ensure before you start with this project is that you need to arrange all the supplies. If you are short on anything, then it’s better to postpone this project until you arranged that material or tool. It is advised because if you start without proper supplies then you may not able to complete your project as per your requirements. It will be a waste of time as well as money. You need to carefully examine the size of bed that you require. For this you should measure the space where you wanted to place this bed. This is an advantage of making a DIY platform bed, that you can easily create a bed as per your requirements.

When it comes to choose the built in storage option. You need to keep in mind your requirements. If you are living in a small space and you are trying to place too many things under your bed, then it will be good to keep storage option to maximum capacity. Otherwise it is advised to go for sleek and simply storage option. It will be easy to made as well as manage.

Are you arranging a party at home? If yes and you are making preparations that can help you in making your party a memorable one, then you will surely require to create a beautiful DIY photo booth. It will not only allow you to take perfect photos but will also make a great memory from the party. Following are some exciting ideas from which you can choose the one that attracts you the most.

Paper Chain Backdrop
Paper chain especially made up with vibrant and bold colors look fantastic background for taking pictures. You can also make this beautiful paper chain at home. You will surely find ideas from online sources. It will also not require too much expertise for making a paper chain.

Chalkboard Backdrop
Another great idea for DIY photo booth is to use chalkboard. The good thing about using a chalkboard is that you can customize it the way you want. You can easily purchase some cheap raw material from the nearby store and you can come up with a unique and interesting idea involving the chalkboard.

Ticket Backdrop
Are you also planning to show a movie to your guests? If this is the case then making a ticket backdrop will not be a bad idea at all. You simply have to get some old movie tickets and arrange them in a way you want. You can affix these tickets with the help of poster putty or tape. It will become a perfect DIY photo booth for your movie themed party.

Old Doors
Do you have some old doors available in your garage? If yes then why are you not utilizing these as a perfect rustic DIY photo background for your party? It will definitely look attractive and unique idea. You can also design and decorate these doors as you want.

If you are living in a small flat with not a big kitchen then you will surely be looking for some hacks which can enhance the storage space. It is also a fact that it will be difficult for many to have designer kitchen. Still there are many easy DIY kitchen organizer ideas that can help you in improving the appearance of your kitchen. Following are some ideas that can definitely help you in improving your kitchen.

Plate Organizer
Like most of the kitchens if you also have some top cabinets then why don`t you utilize the space under these cabinets. You can easily place a plate rack under these cabinets. This will not only help you in showcasing your beautiful plates but will also help you in saving some space in your cabinets which can be utilized for any other purpose. The good thing is that you can create a plate organizer yourself which will also look unique and have a personal touch.

Spice Rack
Another great kitchen organizer idea is to place a spice rack in your kitchen. You will surely agree that a cabinet where you have place different herbs and spices is one of the most difficult to handle. This spice rack can easily be hanged on the wall as well as behind your kitchen door.

Under Cabinet Shelves
If you are looking to add a rustic look to your kitchen along with adding some extra storage option, then you can easily place drawers and shelves under your existing kitchen cabinets. This will not only make your kitchen look rustic but will provide you more options for placing things properly.
These are some simple and easy DIY kitchen organizer ideas that can help you to give a complete new look to your kitchen.

You cannot deny the fact that the hanging shelves really look great. Now day’s people are really looking forward for building these shelves. So if you are also free at home and have nothing to do then why don`t you start DIY hanging shelves project. It will not only provide you a good productivity activity but will also help you to make a beautiful addition to your home.

Tools and Material Required

  • Screw driver
  • Electric drill
  • Screws
  • Level
  • Tape measure
  • Stud sensor
  • Pencil
  • Standard shelf brackets
  • Steps for building Hanging Shelves

Find the anchor studs
First of all you need to locate studs with the help of stud sensor which will allow you to hold these shelves in a standard place. You can mark the studs with the help of pencil.

Height of installation
You should be very much careful while you are looking to determine the height of your hanging shelves. It shouldn`t be too high or too low. Make a balance so that it won`t look bad. Further you can also place your decorative items easily on your hanging shelf. It will be good if you mark the place with pencil and measuring tape. Mostly people love to place these shelves just little above the mid of your wall.

Install shelf standards and brackets
In the next step you are required to secure the shelf standard and brackets with the help of electronic drill. When you are fixing the shelf standards and brackets then make sure that you check the vertical straightness with the help of level.

Install the shelves
The last step that you should do is to affix the wooden plank onto the brackets with the help of wooden screws. You can use screwdriver for this purpose. Make sure that you check carefully that these hanging shelves are secured properly before you put on your decorative items on them.

Building green house is becoming very much popular. Therefore you may have seen may people who are looking to come up with their own green house. It will not only look cool but can also bring nature closer to you. So if you are also interested in building a DIY greenhouse plan, then following are some helpful tips for you.

Choosing Right Design
First and the most important thing that you need to decide is the design of your greenhouse. It depends on the space where you wanted to build this greenhouse and the resources you have. Your greenhouse design will also depend on the type of plant you wanted to grow in there. If you are looking to plant low growing plants and vegetables then a flat greenhouse will be suitable for you. On the other hand if you are looking to have tall plants or vegetables that need climbing then you should go for a taller greenhouse.

Bigger Greenhouse Structures
If you are not worried about space limitation, then it is always recommended to come up with a bigger greenhouse plan. It will be really great and helpful for your plants and vegetables to grow easily. You can also use PVC pipes or other solid material that you want. One thing that you need to know about PVC structures is that they are surely cost effective, but they are not very durable. So if you are looking for long life then choose some other material.

Importance of Ventilation
When you are finalizing your greenhouse plan, then you need to consider about ventilation. It is one of the most important things for any greenhouse. If you wanted your plants to grow healthy, you need to provide them proper ventilation. You will see the results yourself.

Are you looking to build a DIY garden shed for storing your garden equipment and tools? No matter for what purpose you are going to build a garden shed, but there are few basic things that every garden shed must have. Following are some useful tips and ideas for you.

Plan
There are few localities where you need to get permission beforehand to construct a garden shed or at least you need to send in your plan for approval. If you are living in a place where this is the rule, then you need to send your plan for approval first and then start any construction. But if there is no such law, like most of the place, then you can start off with your project by following the authority’s guidelines.

Construction Material
Once you got the approval or have decided about making a DIY garden shed, then you need to decide the material that you wanted to use for your project. It is advised to use timber in place of concrete for making wooden shed and foundation. It is seen that most of the new DIY enthusiast can’t handle concrete better. Wood is little easy to work with because of its light weight and portable nature.

Flooring
Are you going to make a wooden floor for your DIY garden shed? If yes then you should protect it with the help of treated lumber. It will help your wooden floor against wood harming pests as well as wet weather conditions.

Roofing
It is always recommended to come up with pitched roof rather than having a leveled roof. This will reduce your dripping issue. One more thing that you can do is to have large overhang which will not allow the rain water splashes to reach your shed walls.

If you have just bought a new house and looking to renovate it according to your own requirements and choices, then there are plenty of areas where you can do that. Kitchen is one of those parts of your home that can always be made better with new designs and adding new décor. So why don`t you start with DIY kitchen remodel project before you move to other parts.

Mixing Countertops
When you are looking to install countertops for your kitchen, then you need to carefully select these countertops. If you goes for wooden countertops, then you will find these in reasonable price and they are also very easy to install. Further they can also add different characters to your kitchen. So it depends on you that are you looking to replace entire countertop or just a small standalone area.

Tin Tile Backsplash
This is a unique and easy project that will not cost you more than $100. The good thing is that there are number of advantages that you can get by applying this DIY kitchen remodel project. The biggest of them all is that it has reflective properties which can easily brighten up your kitchen. Further it is really easy to clean and you can also find these in number of finishes according to your fixtures and hardware.

Expose the Walls
Open shelves are one of the great Kitchen remodel projects because it can add a different charm to your kitchen. It will also expose the walls of your kitchen which makes it look bigger. You have different options available when it comes to designing your shelves.

You can choose any of these above mentioned DIY kitchen remodel ideas that goes well with your overall home design and theme.

DIY floating shelves are becoming really popular with every passing day. There are many different reason including its style and budget friendly nature. So if you are also interested in making a floating shelf on your own, then following are the supplies required for this project.

Supplies Required

  • 2” x 10” pine board
  • Bench or hand router
  • Drill press (optional)
  • ½” paddle bit
  • Blind shelf floating support invincible brackets
  • Cloth
  • Sand paper
  • Paint or stain
  • Paintbrush
  • Pencil
  • Level
  • Drill

Steps for Building Floating Shelves

Once you have arranged all the supplies then you need to move forward with building DIY floating shelves.

  • The first and the most important thing you need to do is to gather the material and then to cut the board as per the measurements for which you wanted to have a floating shelf.
  • Now you need to mark the sign where you wanted to put the hardware at the back of the shelf. For this you can using hand router. Further if you are going to use the hardware which is mentioned above then you need to have a notch of ½” deep.
  • The next step should be to drill the holes for fixing the hardware. The holes that you make should be 4” deep. In case if you are facing difficult in drilling straight holes then you can use paddle bit because it will be easier for you to make straight holes using paddle bit.
  • The next step should be to remove all sort of stain and sawdust from the DIY floating shelves. This can be done with the help of sandpaper and then you can paint these shelves with the color that you choose for these shelves.
  • You are almost done with your project. The last thing you need to do is to hang the shelf in its pace. By using the hardware that is mentioned, you will be able to give your floating shelves an advantage of bearing more weight as compare to wooden supports.

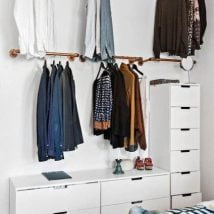
If you are looking to add more space to your wardrobe and are searching some ideas, then you have reached right place. Here you will find different easy and exciting DIY wardrobe ideas that can not only make your wardrobe look unique and attractive but can also provide you extra storage facility.

Doors
You must have seen that there are many wardrobes, who`s door are of no use. So why don`t you bring to life. You can simply put a mirror on the outer side which can surely provide a great overall look. Further you can also use the inside of your wardrobe door to place some small shelves that can allow you to put different small things on it. Or you may also hang some small baskets which can hold on your different accessories perfectly.

Adding another Rod
If you are looking to add space in your kid’s wardrobe then you can easily add a second hanging rod in the wardrobe. This rod should be placed in the center of your wardrobe. It will not only allow you hang more dresses but you will also place these dresses at little distance from others so they won`t get tangled.

Shoe Shelves
Another easy and interesting DIY Wardrobe idea is to add a shoe shelf. You can do this at the bottom end of your wardrobe. It will surely provide you enough space that you can place 15 pairs of shoes easily in that space. Further you don`t need to have a separate storage option for your shoes. So this will serve your two requirements easily.

These are few of the many easy DIY wardrobe ideas that can help you a great deal in making good storage space in your wardrobe. It is especially really effective for those who are living in small spaces.